 Kivan Polimis
Make a Pelican Blog
Kivan Polimis, Thu 24 March 2016, How-to
Kivan Polimis, Thu 24 March 2016, How-to
The goal of this post is to use Pelican, a static-blogging Python package, and Travis-CI to automatically deploy a Github-hosted blog. Your blog's URL will be username.github.io. You will need Github and Travis-CI accounts.
I chose to use Pelican instead of other Python alternatives after reading this Jake Vanderplas post. These instructions are written for Linux-based operating systems (my computer uses Linux Mint) and some workarounds may be necessary if you have another operating system to install software.
We will use two separate git repositories on Github for the source and the built website, let's first only create the repository for the source
Login to Github and create a repository named: <username>.github.io-src. Initialize this repo with a README.md so you can clone immediately. The <username>.github.io-src repository is the source repo for the Pelican blog.
I recommend creating a virtual environment to blog in for flexibility with Python package installations.
conda create -n blog python==3.5
source activate blog
pip install pelican
Additional packages to install for website development
pip install markdown fabric beautifulsoup4 typogrify pillow webassets
Change directory to <username>.github.io-src folder
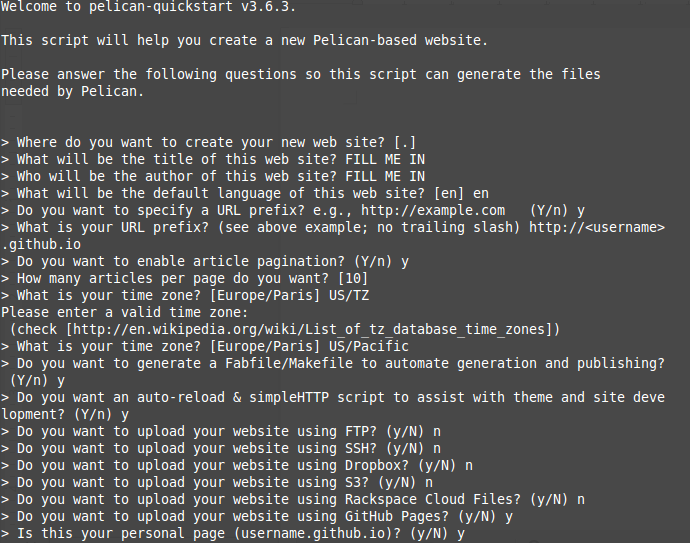
Run pelican-quickstart to set up the Pelican blogging platform. The screenshot below shows how to answer the quickstart questions to allow your blog to be hosted on Github.
pelican-quickstart
Add requirements.txt for Pelican blog build on Travis
(echo pelican; echo markdown; echo fabric; echo beautifulsoup4; echo typogrify; echo pillow;
echo webassets) >> requirements.txt
Create a .travis.yml file for Travis build
branches:
  only:
  - master
language: python
python:
- 3.5
install:
- pip install -r requirements.txt --use-mirrors
script:
- make html
notifications:
  email:
    on_success: always
    on_failure: always
after_success: bash deploy.sh
after_script:
  - git config credential.helper "store --file=.git/credentials"
  - echo "https://${GH_TOKEN}:@github.com" > .git/credentials
In order to create the encrypted token, you can login to the Github web interface to get an Authentication Token, and then install the travis command line tool with:
Select your avatar in the top right of the screen
Select settings
Select Personal access tokens
Select generate new token near upper right of the screen
copy the token to a text editor
Select your avatar in the top right of the screen again
Select integrations
Select Travis CI
Add to github account and authorize application
In the travis-ci.org web interface:
Select your account name in the top right
Refresh and flick the repository switch on for your .io-src repository
On Ubuntu you need ruby dev to install travis
sudo apt-get install ruby1.9.1-dev
sudo gem install travis
Inside <username>.github.io-src repository:
travis encrypt GH_TOKEN=LONGTOKENFROMGITHUB --add env.global
The previous command leads to the folllowing prompt:
"detected repository as <username>.github.io-src, is this correct?"
type yes
Then create a deploy.sh script and update the global variable with yours:
#!/usr/bin/env bash
BRANCH=master
TARGET_REPO=<username/username.github.io.git>
PELICAN_OUTPUT_FOLDER=output

echo -e "Testing travis-encrypt"
echo -e "$VARNAME"

if [ "$TRAVIS_PULL_REQUEST" == "false" ]; then
    echo -e "Starting to deploy to Github Pages\n"
    if [ "$TRAVIS" == "true" ]; then
        git config --global user.email "<user_email>"
        git config --global user.name "<username>"
    fi
    #using token clone gh-pages branch
    git clone --quiet --branch=$BRANCH https://${GH_TOKEN}@github.com/
    $TARGET_REPO built_website > /dev/null
    #go into directory and copy data we're interested in to that directory
    cd built_website
    rsync -rv --exclude=.git  ../$PELICAN_OUTPUT_FOLDER/* .
    #add, commit and push files
    git add -f .
    git commit -m "Travis build $TRAVIS_BUILD_NUMBER pushed to Github Pages"
    git push -fq origin $BRANCH > /dev/null
    echo -e "Deploy completed\n"
fi
Create first commit for <username>.github.io-src repo
git pull origin master
git status
git add .
git commit -m "initial commit"
git push origin master
Then we can create the repository that will host the actual blog:
create the <username>.github.io repository for the website (initialize with README.md for immediate cloning)
deploy.sh will not run without an initial post. Pelican blog posts can be written in markdown or reStructuredText.
cd content/
touch first-post.md
Post follow the following format:
Title:
Date:
Author:
Category:
See Pelican documentation for additional information on using Pelican to generate a static site.
After writing an initial post, use pelican command to generate a static html webpage
cd ..
pelican content
Preview your site locally before pushing and building on Travis
Other installation materials I've consulted suggest running the following commands in a new terminal.
cd <username>.github.io-src\output
python -m pelican.server
Your site is running locally at port 8000 http://localhost:8000/
Commit your first post to <username>.github.io-src
git status
git add .
git commit -m "added first post"
git push origin master
Run deploy.sh file to build your blog with Travis
chmod +x deploy.sh
sh deploy.sh
Running sh deploy.sh creates the built_website folder that contains all website data, from .html pages to css stylesheets
I receive an access denied/authentication error the first time deploy.sh executes
Add your <username>.github.io repository as the origin in built_website folder
cd built_website
git remote add http https://github.com/<username>/<username>.github.io.git
git remote remove origin
git remote rename http origin
git remote -v
Github defaults to Jekyll, a Ruby package, to format static .html sites. Because our blog is formatted with Pelican, we need to add a .nojekyll file to ignore Jekyll defaults
touch .nojekyll
git add .nojekyll
Commit the .nojekyll file to your <username>.github.io repository
git commit -m "added .nojekyll file for formatting"
git push origin master
Commit the .nojekyll file and built_website folder to your <username>.github.io-src repository
cd ..
git status
git pull origin master
git add built_website
git commit -m "adding .nojekyll file and built_website folder"
git push origin master
now run deploy.sh to build your website on Travis
sh deploy.sh
Your website is available at username.github.io
Workflow for posts
- Write post as .md and place in content folder
- Run pelican content
- Add and commit new posts to <username>.github.io-src repository
- Use deploy.sh to automatically push <username>.github.io-src repository and build <username>.github.io website
- Commit published posts from deploy.sh to <username>.github.io repository